Advanced
Offline Installation
If your network environment blocks access to GitHub (e.g., corporate firewall restrictions), you can manually download and install the Language Server component required by C# Dev Tools.
Why Manual Installation?
Section titled “Why Manual Installation?”C# Dev Tools automatically downloads its Language Server component from GitHub on first activation. If this download fails due to network restrictions, you’ll need to install it manually.
Step 1: Download the Language Server
Section titled “Step 1: Download the Language Server”Download the appropriate zip file for your platform from the GitHub Releases page:
| Platform | Architecture | Download File |
|---|---|---|
| Windows | x64 | csharp-dev-tools-lsp-win-x64.zip |
| Windows | ARM64 | csharp-dev-tools-lsp-win-arm64.zip |
| Linux | x64 | csharp-dev-tools-lsp-linux-x64.zip |
| Linux | ARM64 | csharp-dev-tools-lsp-linux-arm64.zip |
| macOS | Intel (x64) | csharp-dev-tools-lsp-osx-x64.zip |
| macOS | Apple Silicon (ARM64) | csharp-dev-tools-lsp-osx-arm64.zip |
Step 2: Locate the Installation Directory
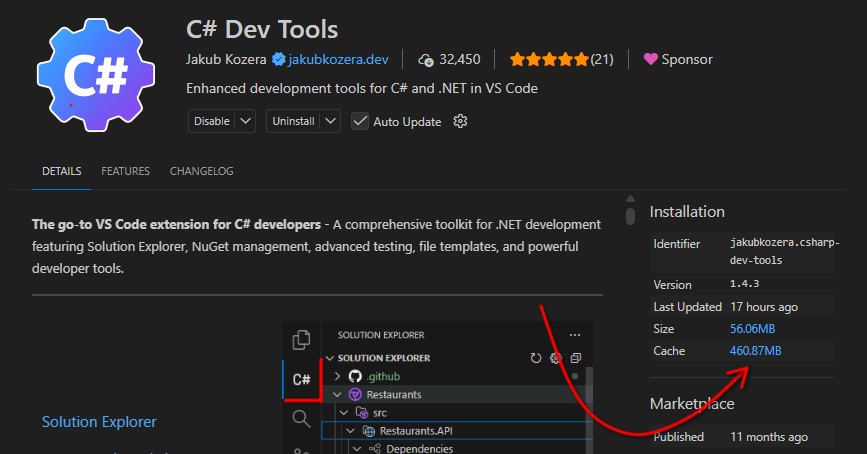
Section titled “Step 2: Locate the Installation Directory”The easiest way to find the correct folder — regardless of whether you’re using VS Code, VS Code Insiders, Cursor, or any other fork:
- Open the Extensions view (
Ctrl+Shift+X/Cmd+Shift+X) - Search for C# Dev Tools and click on it to open the extension details
- In the right-hand Installation panel, click the Cache size link (e.g.
460.87MB) — this opens the extension’s cache folder in your file explorer
- Inside that folder, create a new subfolder named
lsp— this is where you will extract the downloaded files
Step 3: Extract the Files
Section titled “Step 3: Extract the Files”- Create the
lspfolder if it doesn’t exist - Extract the contents of the downloaded zip file into the
lspfolder - After extraction, your folder structure should look like this:
lsp/├── LanguageServer/│ ├── CsharpDevTools.exe (or CsharpDevTools on Linux/macOS)│ └── ... (other files)├── DebuggerMono/│ └── ... (debugger files)├── NotebookHost/│ └── ... (notebook host files)└── version.txtStep 4: Create Version Marker
Section titled “Step 4: Create Version Marker”Create a version.txt file in the lsp folder containing the version number you downloaded (e.g., 1.4.1):
Windows (PowerShell)
Section titled “Windows (PowerShell)”echo "1.4.1" > "$env:APPDATA\Code\User\globalStorage\jakubkozera.csharp-dev-tools\lsp\version.txt"macOS / Linux
Section titled “macOS / Linux”echo "1.4.1" > ~/Library/Application\ Support/Code/User/globalStorage/jakubkozera.csharp-dev-tools/lsp/version.txtStep 5: Set Executable Permissions (Linux/macOS only)
Section titled “Step 5: Set Executable Permissions (Linux/macOS only)”On Linux and macOS, you need to make the server binaries executable:
chmod +x ~/Library/Application\ Support/Code/User/globalStorage/jakubkozera.csharp-dev-tools/lsp/LanguageServer/CsharpDevToolschmod +x ~/Library/Application\ Support/Code/User/globalStorage/jakubkozera.csharp-dev-tools/lsp/DebuggerMono/monodbgAdjust the path for Linux:
chmod +x ~/.config/Code/User/globalStorage/jakubkozera.csharp-dev-tools/lsp/LanguageServer/CsharpDevToolschmod +x ~/.config/Code/User/globalStorage/jakubkozera.csharp-dev-tools/lsp/DebuggerMono/monodbgStep 6: Restart VS Code
Section titled “Step 6: Restart VS Code”Restart VS Code completely (close all windows) to ensure the extension picks up the manually installed Language Server.
Verifying Installation
Section titled “Verifying Installation”After restarting VS Code:
- Open a folder containing a C# solution
- Open the Output panel (
Ctrl+Shift+U/Cmd+Shift+U) - Select “C# Dev Tools” from the dropdown
- You should see messages indicating the Language Server is starting
Updating
Section titled “Updating”When updating the extension, you may need to repeat this process if the required Language Server version changes. The extension will attempt to download the new version automatically, but if that fails, download the matching version from GitHub and repeat the extraction steps.
Troubleshooting
Section titled “Troubleshooting”Extension Still Tries to Download
Section titled “Extension Still Tries to Download”If the extension still attempts to download after manual installation:
- Verify the
version.txtfile exists and contains the correct version - Check that the folder structure matches the expected layout
- Ensure file permissions allow VS Code to read the files
Permission Denied Errors
Section titled “Permission Denied Errors”On Linux/macOS, ensure the binary files are executable (see Step 5).
Wrong Architecture
Section titled “Wrong Architecture”If you see errors about invalid executables, verify you downloaded the correct platform/architecture combination for your system.
For additional help, open an issue on GitHub.