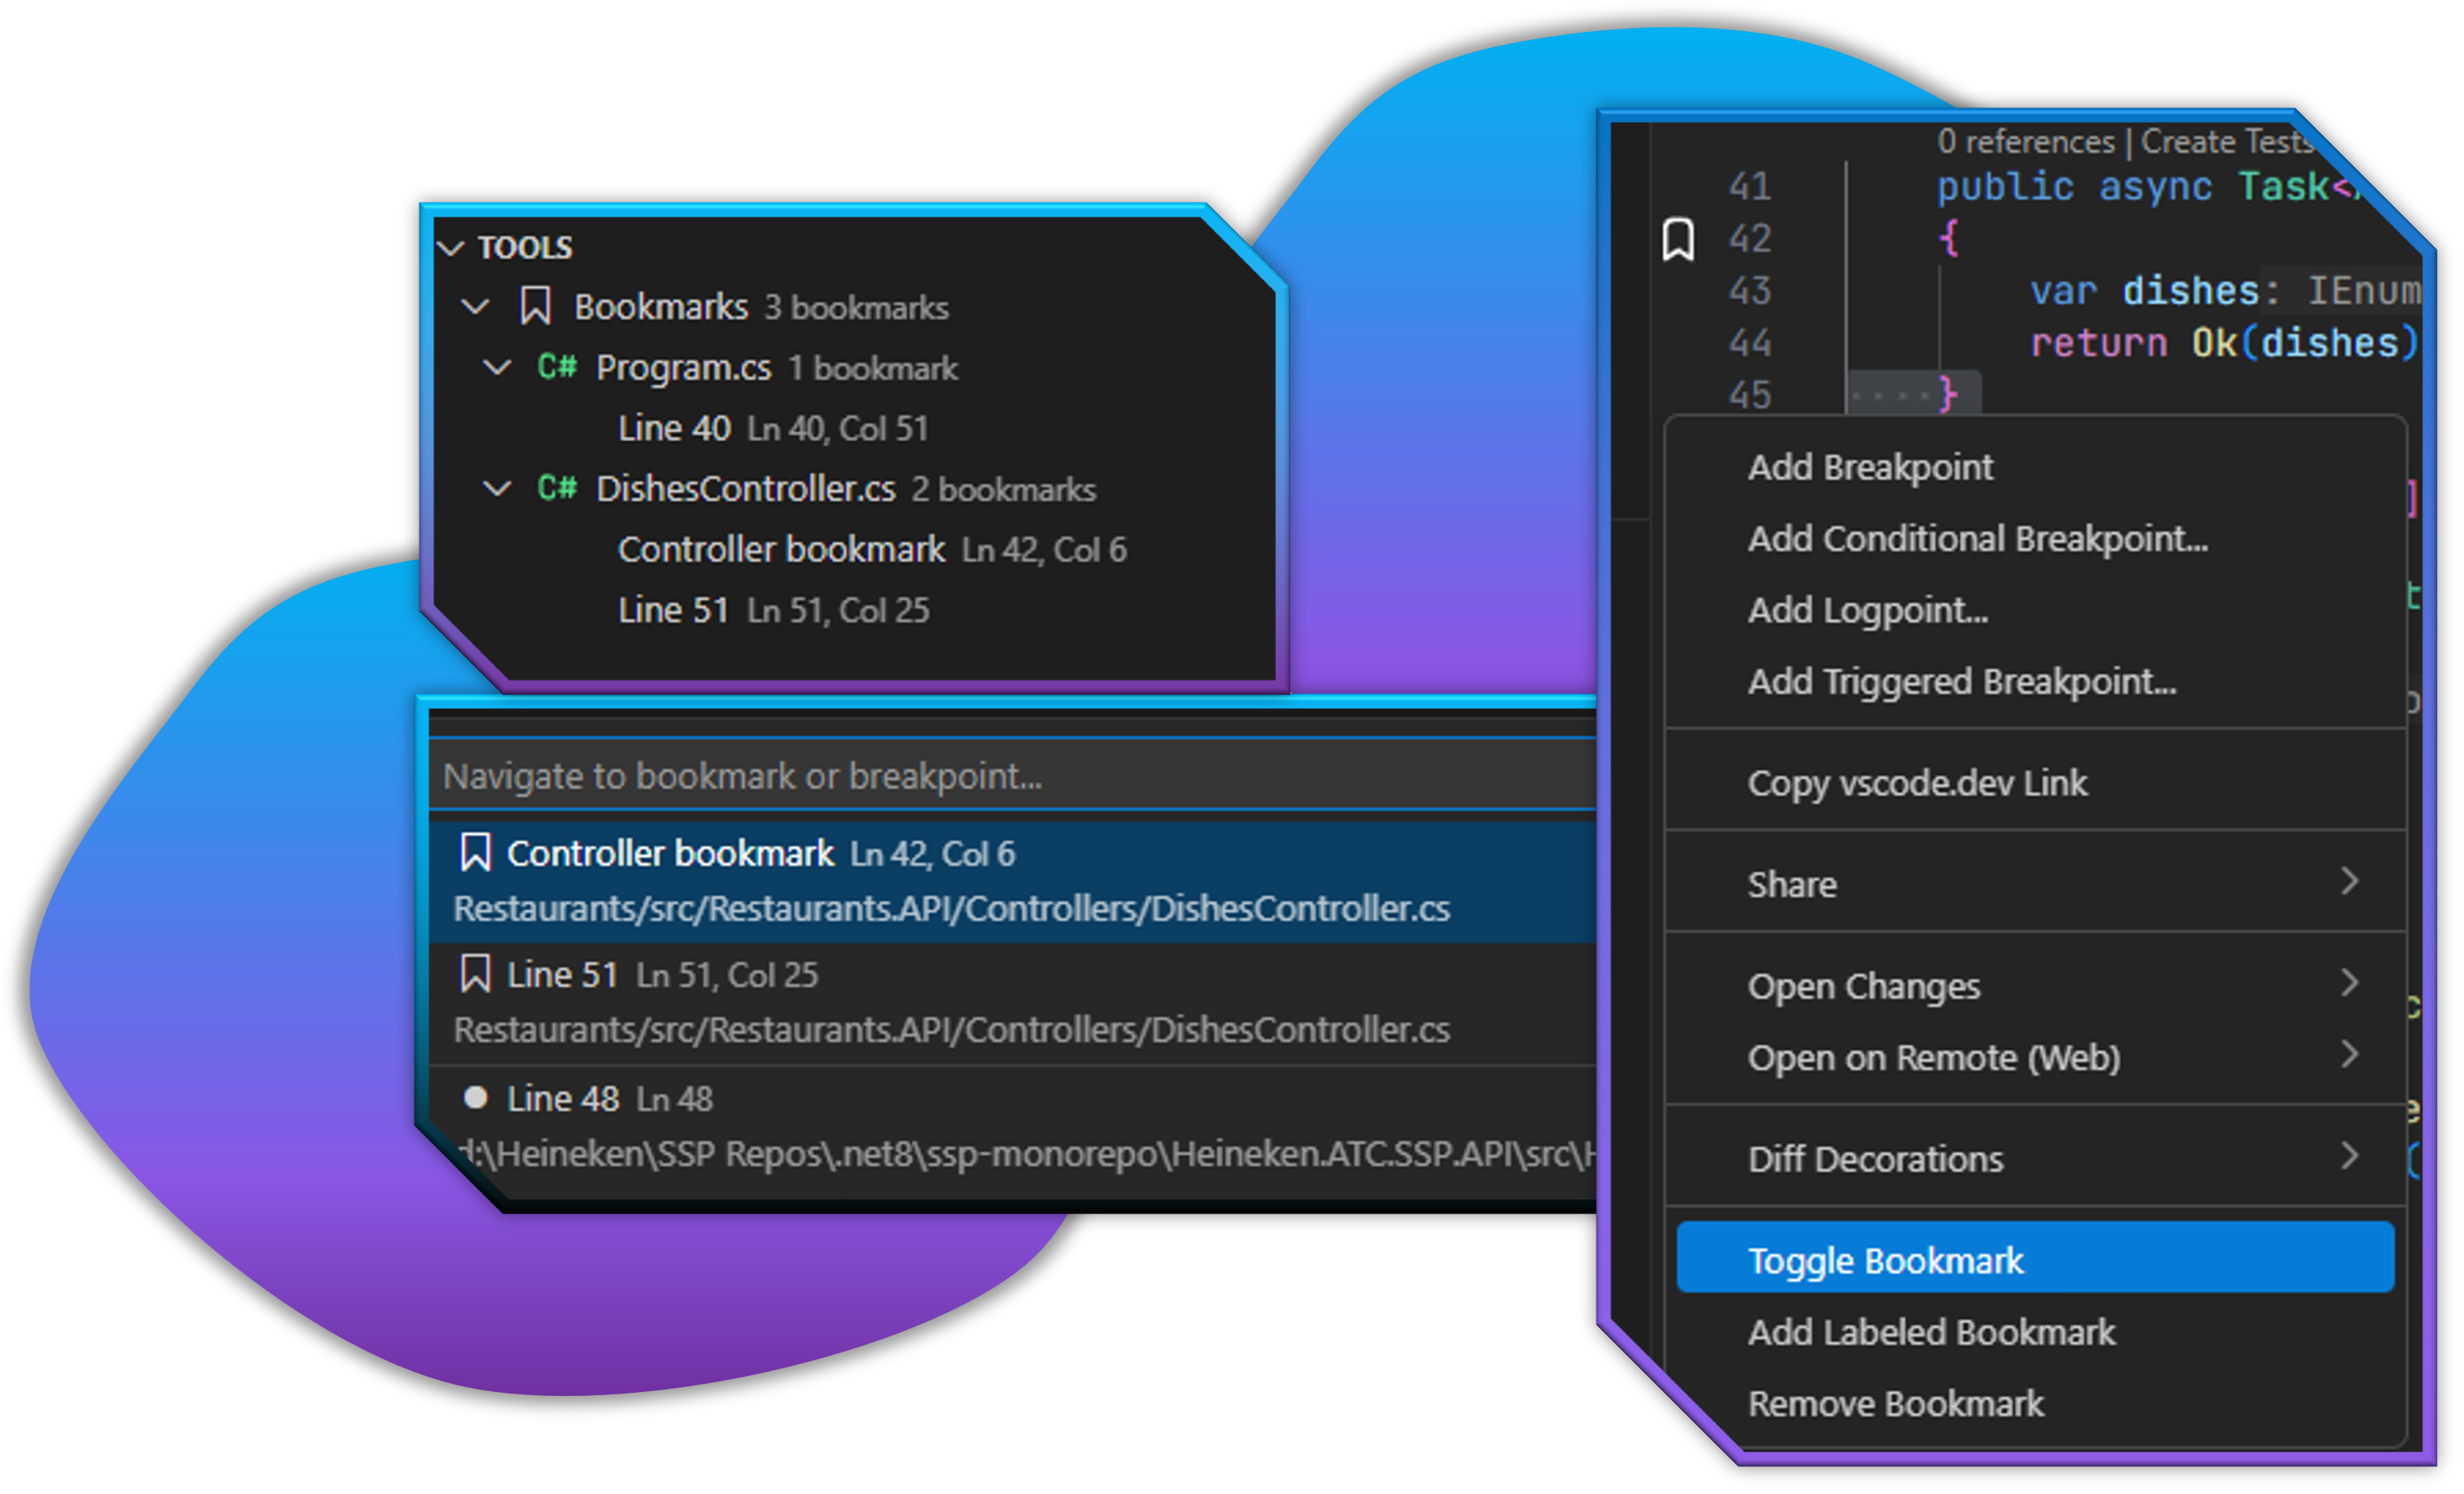
Tools
Bookmarks
The Bookmarks feature provides a comprehensive system for marking and navigating to important locations in your code across your entire workspace.
Overview
Section titled “Overview”The Bookmark system enhances your coding workflow by allowing you to:
- Mark important code locations with visual indicators
- Navigate between bookmarks globally across all files
- Organize bookmarks in a dedicated tree view
- Add labels to bookmarks for better organization
- Integrate with debugging breakpoints for unified navigation
- Use keyboard shortcuts for efficient bookmark management
Getting Started
Section titled “Getting Started”Accessing Bookmarks
Section titled “Accessing Bookmarks”Bookmarks are available in the Tools section of the Solution Explorer:
- Open the Solution Explorer from the Activity Bar
- Expand the Tools section
- The Bookmarks subsection shows all your workspace bookmarks
Creating Your First Bookmark
Section titled “Creating Your First Bookmark”There are several ways to create a bookmark:
Using Keyboard Shortcut:
- Position your cursor on the line you want to bookmark
- Press
Alt+Shift+Downto toggle a bookmark
Using Gutter Right-Click:
- Right-click on the line number in the editor gutter
- Select Toggle Bookmark or Add Labeled Bookmark
Using Command Palette:
- Press
Ctrl+Shift+Pto open the Command Palette - Type “Toggle Bookmark” and select the command
Navigation
Section titled “Navigation”Global Navigation
Section titled “Global Navigation”Unlike many bookmark systems that only navigate within the current file, C# Dev Tools provides global navigation across your entire workspace:
- Next Bookmark:
Alt+Shift+Right- Jump to the next bookmark in any file - Previous Bookmark:
Alt+Shift+Left- Jump to the previous bookmark in any file
Navigation wraps around, so after the last bookmark, it will jump to the first bookmark in your workspace.
Unified Bookmark and Breakpoint Navigation
Section titled “Unified Bookmark and Breakpoint Navigation”Press Alt+Shift+Up to open a unified quick-pick interface that shows:
- All workspace bookmarks with their labels and file locations
- All active debugging breakpoints
- Visual separator between bookmarks and breakpoints
This allows you to quickly jump between both code bookmarks and debugging breakpoints from a single interface.
Tree View Navigation
Section titled “Tree View Navigation”In the Solution Explorer’s Tools > Bookmarks section:
- File Level: See all files that contain bookmarks
- Bookmark Level: Expand files to see individual bookmarks with their labels and line numbers
- Click to Navigate: Click any bookmark to jump directly to that location
Visual Indicators
Section titled “Visual Indicators”Gutter Icons
Section titled “Gutter Icons”Bookmarked lines display a bookmark icon in the editor gutter, making them easily visible while coding.
Bookmark Management
Section titled “Bookmark Management”Adding Labels
Section titled “Adding Labels”When creating a bookmark via right-click gutter menu:
- Right-click on a line number in the gutter
- Select Add Labeled Bookmark
- Enter a descriptive label for the bookmark
- The label will appear in the tree view and quick-pick interface
Removing Bookmarks
Section titled “Removing Bookmarks”Individual Bookmarks:
- Use
Alt+Shift+Downon a bookmarked line to toggle it off - Right-click the gutter and select Remove Bookmark
- Click the X button next to a bookmark in the tree view (appears on hover)
File-Level Clearing:
- In the tree view, hover over a file with bookmarks
- Click the X button to clear all bookmarks in that file
Clear All Bookmarks:
- Click the Clear All button in the Bookmarks tree view header
- Or use the command palette: “Clear All Bookmarks”
Inline Actions
Section titled “Inline Actions”The bookmark tree view provides hover-activated inline actions:
- X Button on Files: Clear all bookmarks in the selected file
- X Button on Bookmarks: Remove individual bookmarks
- Clear All Button: Remove all bookmarks from the workspace
Keyboard Shortcuts
Section titled “Keyboard Shortcuts”| Shortcut | Action |
|---|---|
Alt+Shift+Down | Toggle bookmark at current line |
Alt+Shift+Right | Go to next bookmark (globally) |
Alt+Shift+Left | Go to previous bookmark (globally) |
Alt+Shift+Up | Show bookmark and breakpoint quick-pick |
Context Menus
Section titled “Context Menus”Gutter Context Menu
Section titled “Gutter Context Menu”Right-click on any line number in the editor gutter to access:
- Toggle Bookmark: Add or remove a bookmark on that line
- Add Labeled Bookmark: Create a bookmark with a custom label
- Remove Bookmark: Remove an existing bookmark (when present)
Tree View Context Menu
Section titled “Tree View Context Menu”Right-click on items in the bookmark tree view:
File Items:
- Clear File Bookmarks: Remove all bookmarks from the selected file
Bookmark Items:
- Go to Bookmark: Navigate to the bookmark location
- Remove Bookmark: Delete the selected bookmark
Integration Features
Section titled “Integration Features”Auto-Refresh
Section titled “Auto-Refresh”The bookmark tree view automatically updates when:
- New bookmarks are added
- Existing bookmarks are removed
- Files are renamed or moved
- The workspace is refreshed
Multi-File Support
Section titled “Multi-File Support”Bookmarks work seamlessly across:
- Multiple files in the same project
- Files in different projects within the solution
- Files outside of projects but within the workspace
Smart Sorting
Section titled “Smart Sorting”Bookmarks are displayed in a logical order:
- Tree View: Grouped by file, then by line number
- Quick-Pick: Sorted by file path, then by line number
- Global Navigation: Sequential order across all files
Tips and Best Practices
Section titled “Tips and Best Practices”Effective Labeling
Section titled “Effective Labeling”Use descriptive labels for your bookmarks:
TODO: Refactor this methodBug: Fix null reference hereReview: Performance bottleneckEntry point for feature X
Workflow Integration
Section titled “Workflow Integration”Combine bookmarks with other features:
- Mark important code sections while debugging
- Bookmark areas that need refactoring
- Mark entry points for complex features
- Use with breakpoints for comprehensive code navigation
Keyboard-Driven Workflow
Section titled “Keyboard-Driven Workflow”For maximum efficiency:
- Use
Alt+Shift+Downto quickly mark locations while coding - Use
Alt+Shift+Right/Leftfor fast navigation during code reviews - Use
Alt+Shift+Upwhen you need to choose between multiple bookmarks or breakpoints
Project Organization
Section titled “Project Organization”Organize bookmarks by purpose:
- Keep temporary bookmarks for current work sessions
- Use labeled bookmarks for permanent reference points
- Clear old bookmarks regularly to maintain a clean workspace
The bookmark system is designed to enhance your coding productivity by providing quick access to important code locations while maintaining a clean and organized development environment.